Booting the kernel
1. Preparing a virtual machine
1.0. Getting dependencies
Debian/Ubuntu and derivatives
sudo apt -y install git git-email fakeroot build-essential ncurses-dev xz-utils libssl-dev bc flex libelf-dev bison qemu-system debootstrap
Fedora and derivatives
sudo dnf install -y elfutils-libelf-devel openssl-devel openssl-libs git-all make flex bison binutils qemu debootstrap ncurses ncurses-devel
Arch Linux and derivatives
sudo pacman -S --needed base base-devel git util-linux binutils bc qemu-full debootstrap ncurses
For a more complete and updated list of requirements for building the kernel, visit the Minimal requirements to compile the kernel page.
1.1. Creating a Linux image for testing
Here we are going to create a separate space on our machine that will be our environment for testing the kernel.
Use the truncate command to create a sparse file (a file that allocates space as needed) to be our disk.
truncate -s 4G my_disk.raw
Now we have to format our disk so it behaves as a single partition. We create an ext4 file system on our disk partition. This action will make this file contain a new file system as its data. It'll be ready to contain files and folders.
mkfs.ext4 my_disk.raw
At this moment we've successfully created a file that represents a partition, so we are going to mount it. For this step we suggest the creation of a directory to be the mounting point.
mkdir mnt_partition
sudo mount my_disk.raw mnt_partition
1.2. Installing Debian on partition
Normally Debian is used for testing the kernel, so that will be the distro we will be using on our VM for testing our kernel.
We will use a tool called debootstrap to create a Debian root filesystem (rootfs) within my_disk.raw:
sudo debootstrap stable mnt_partition http://deb.debian.org/debian/
1.2.1. Inside the new system
At this point we have a fully functional Debian filesystem, with all the programs you would normally find in a Debian install (try looking inside the mnt_partition folder). We can "enter" this Debian filesystem by doing something called a chroot (change root). You will need sudo permissions to run this command.
sudo chroot mnt_partition /bin/bash
Now you're 'kind of' inside your debian install.
You can verify the files and folders installed in this new disk with ls and pwd.
It is convenient to set the root password beforehand (so that you can login as root later when you boot into your VM for testing the kernel:
passwd
You can exit the chroot environment.
To exit the chroot environment
Type Ctrl+d (or run exit command).
After exiting the chroot, you can unmount it:
sudo umount mnt_partition
2. Building and booting the kernel
2.0. Getting the Linux source tree
First of all we will clone the Linux kernel repository. This can take some time because the kernel project is huge. If you want this process to be faster, you can use the --depth=1 flag, which will fetch only the latest commit from upstream. But remember that in order to make contributions, you will need to fetch the entire tree.
git clone --depth=1 git://git.kernel.org/pub/scm/linux/kernel/git/torvalds/linux.git
Tips
- If you have enough time and a fast internet connection, you can go ahead and pull the entire tree:
git clone git://git.kernel.org/pub/scm/linux/kernel/git/torvalds/linux.git - If you already have the (whole) tree cloned you can pull only the latest commits:
git fetch && git pull
2.1. Compiling your kernel
First, move into your freshly cloned kernel tree:
cd linux
2.1.1. Setting up the kernel config
When compiling your kernel, you can choose exactly which features the kernel will have support for; this is done through the kernel config file (.config at the root of the kernel source tree). We will talk about kernel configs in a lot more depth during the device drivers workshop. For now, we will build the kernel with the default config target: defconfig.
More about config targets
- If you run
make help | grep config, you will see that there are several config targets, each generating a.configmeant for different purposes defconfigis the "default" one ("default" meaning it is relatively lightweight and is able to boot in most environments with minimal/no tweaking)
make defconfig
You can take a cursory glance at the options enabled in your newly generated .config file (at the root of the source tree).
2.1.2. Building the kernel
Now we can finally build the kernel itself. The kernel is a very big project, so it takes quite a bit of time/CPU to compile. In order to squeeze the maximum amount of juice from our CPU, we can compile the kernel in parallel by passing the -jN flag to make:
make -j$(nproc)
What is nproc?
nprocis a command that returns the number of threads on your processor, so we're compiling the kernel in parallel using all threads available on the CPU for maximum efficiency.
2.2 Boot into your VM using QEMU
After the build finishes, you will find your very own customized, homegrown, and source-compiled kernel image in ./linux/arch/x86/boot/bzImage. Using qemu, we will spin up a virtual machine running our custom kernel on top of the Debian rootfs we created earlier.
First, check if your machine supports hardware acceleration for virtualization:
cat /proc/cpuinfo | grep -E "(vmx|svm)"
Then, check if your kernel has KVM support enabled:
ls /dev/kvm
Important
If either of the two steps above failed, that means your machine doesn't have virtualization support enabled, and you won't be able to use KVM for your VMs. There is usually a "Virtualization Support" option somewhere in your BIOS/UEFI firmware that needs to be enabled.
If you can't get it to work at all, remove the --enable-kvm option from the qemu command below. Virtualization will be a lot slower, though.
Finally, launch a VM to test your freshly built kernel with:
qemu-system-x86_64 \
    -drive file=../my_disk.raw,format=raw,index=0,media=disk \
    -m 4G \
    -nographic \
    -kernel ./arch/x86_64/boot/bzImage \
    -append "root=/dev/sda rw console=ttyS0 loglevel=6" \
    --enable-kvm
What do all these arguments/flags mean?
-drive file=../my_disk.raw,format=raw,index=0,media=disk: specify that themy_disk.rawfile should be provided as the first hard disk in the emulated system.-m 4G: amount of RAM we are going to loan to the virtual machine.-nographic: QEMU will run on the terminal instead of a graphical window.-kernel ./arch/x86_64/boot/bzImage: define the file where your compressed kernel image is. You can also use the kernel installed on your machine, it should be somewhere in/boot-smp 1: how many virtual CPUs QEMU will use.-append "root=/dev/sda rw console=ttyS0 loglevel=5": kernel command line parameters:rootdefines which disk/partition has the root file system. In our case, it will be the first storage device, the hard diskmy_disk.raw;rwmeans we will be able to read and write to disk;consoleis to set the standard output of the kernel and of the PID 1;loglevelis to set how much log the kernel will output to the console and 7 is the highest and it will display all the kernel messages in the console prompt;
--enable-kvm: this is to enable hardware acceleration for virtualization (using KVM).
Congratulations!! You've successfully built and booted your first kernel!
To enter the machine just type: root as you user.
And type you recently set password.
Check the version of the kernel on your VM:
uname -r
To quit the virtualized environment
Type Ctrl+a followed by x (or run shutdown now command).
My terminal started behaving weirdly inside the VM/after exiting the VM!
- This can happen sometimes since QEMU uses your stdout as a serial device for the kernel console. Fix it by running the
resetcommand.
3. (extra) Playing with kernel
Now that you have already built and booted the kernel, we are going to navigate and play with it.
To read the messages displayed by kernel, we use the dmesg command.
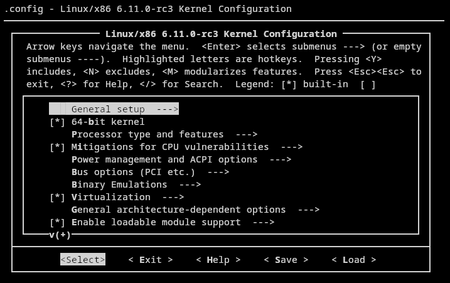
3.1. You can have a custom name to your kernel
Here we are going to explore another config option of the Makefile.
The make menuconfig will provide an interactive menu to chose which modules to compile.
It also give you the option to name your configured kernel. This is what we are going to do in this tutorial.
- Select General Setup
- Select Local Version
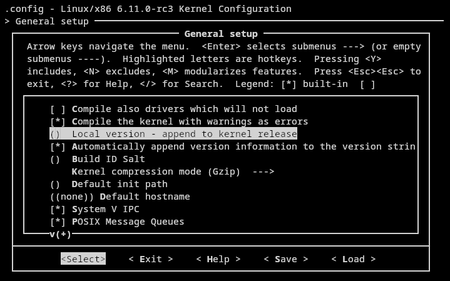
- Write down your kernel version suffix
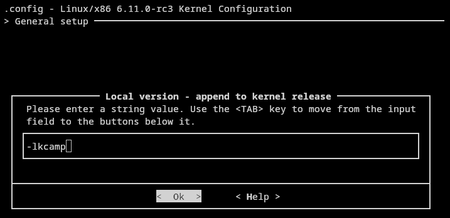
- Check your suffix on local version. Save and exit
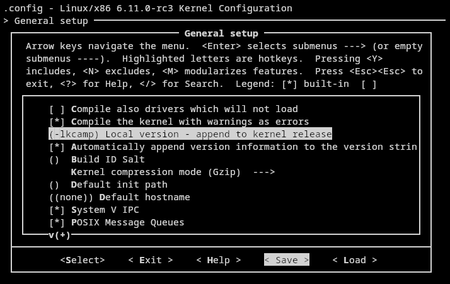
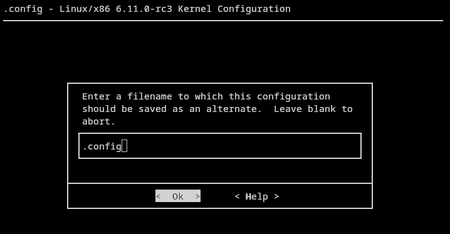
- Save your configuration on your
.config
Now, for testing the changes go ahead: build and boot again your kernel.
3.2. Hello world
Let's make a hello world in kernel version.
We are going to add a message in the kernel's main initialization file: linux/init/main.c
For this activity, we will make sure to add the change to one of the last steps of the initialization.
In the kernel_init function, add a pr_info (print information) to print out a log message. Add this right after rcu_end_inkernel_boot(); line, as follows:
rcu_end_inkernel_boot();

// Add this line for print in kernel
pr_info("########################## I can hack the kernel ##########################\n");
Now, for testing the changes go ahead: build and boot your kernel.
To more information of the Linux kernel initialization processes.
Other print options
pr_emerg: print an emergency-level messagepr_alert: print an alert-level messagepr_crit: print a critical-level messagepr_err: print an error-level messagepr_warn: print an warning-level messagepr_notice: print an notice-level messagepr_info: print an information-level messagepr_develandpr_debug: print a debug-level message conditionally
More about message logging on the documentation.
3.3. Let's crash the kernel
We can have a little more fun and crash the kernel. If you have been very adventurous with your kernel, you may have already seen the message:
---[ end Kernel panic - not syncing: ** BLUB HERE ** ]---
This means something triggered the panic function of the kernel. We can call it to see it happened.
Attention
Be careful with this command! It will crash the kernel! Never boot a crashed kernel on your working machine.
To crash the kernel, we will look at the kernel entry point, the function start_kernel in the linux/init/main.c file.
You can test different places on code to add the panic.
Here, we are going to add it right before the definitions, after locking_selftest(); line.
locking_selftest();

// Add this line for crash the kernel
panic("OH MY GOD! I HAVE A KERNEL PANIC!");
Now, for testing the changes go ahead: build and boot again... oopsie KERNEL PANIC
Attention
Remember to remove this line after testing to recover a functional kernel.