First Contribution
1. Preparing your tools
We assume here that you've already installed the dependencies detailed in the boot tutorial.
1.0. Fetching the new dependencies
Debian/Ubuntu and derivatives
sudo apt install python3-ply python3-git
Fedora and derivatives
sudo dnf install python-ply python-GitPython
Arch Linux and derivatives
sudo pacman -Syu --needed perl-authen-sasl perl-io-socket-ssl python-ply python-gitpython
1.1. Update your kernel
We will work on the staging tree, that contains code that is not
considered ready for merging into the main portion of the kernel due
to various reasons (i.e. not meeting the project's quality standards yet).
Haven't cloned the staging tree yet?
git remote add staging git://git.kernel.org/pub/scm/linux/kernel/git/gregkh/staging.git
You can see all the remotes you have simply by running the git remote -v command.
You can fetch the current staging branches with the following:
git fetch staging
Then create your own branch from staging/staging-next:
git checkout -b first-patch staging/staging-next
1.2. Setup git and email
To be able to send Linux kernel patches, you'll need to configure:
- Your identity (name + email)
- Your text editor of choice: Vim (
vim), VS Code (code), ... - Your email settings (so that you can send email patches with git)
Inside your kernel repository folder, edit the .git/config file (or create it
if it doesn't exit) and add the following fields (remember to fill them
with your own info):
[user]
  email = <your-email-address>
  name = <your-name>
[core]
  editor = <your-favorite-editor>
[sendemail]
  smtpServer = <your-smtp-server>
  smtpServerPort = <your-smtp-port>
  smtpEncryption = tls
  smtpUser = "<your-email-address>"
  smtpPass = "<your-email-password>"
Here are some example [sendemail] setups for the two most common use
cases: a Gmail account and a generic email account:
@gmail.com
[sendemail]
    smtpServer = smtp.gmail.com
    smtpServerPort = 587
    smtpEncryption = tls
    smtpUser = "your.user@gmail.com"
    smtpPass = "your.password"
Be aware of Gmail security
Gmail has a security feature that blocks e-mails sent through an unsecured external app. Activate the permission for less secure apps to use your email: https://myaccount.google.com/lesssecureapps
Protect your password
Leaving your password on an unencrypted file is never a good idea. So, instead of leaving your password on plaintext, you can use an app-specific password.
To better protect your email, you can activate 2FA: https://myaccount.google.com/signinoptions/two-step-verification
Now you can generate an app-specific password for use with git send-email. Visit https://security.google.com/settings/security/apppasswords to create it.
After logging into your Google account, choose an app name, for example "git send-email", and
paste the generated password into the smtpPass field. Watch out, though, this password is only shown a single time.
@lkcamp.dev
[sendemail]
    smtpServer = smtp.purelymail.com
    smtpServerPort = 587
    smtpEncryption = tls
    smtpUser = "your.user@lkcamp.dev"
    smtpPass = "your.password"
Protect your password
Leaving your password in an unencrypted file is never a good idea. Instead of storing your password in plaintext, please consider using msmtp as a local SMTP server, which allows you to manage your password more securely.
1.3 Setup text editor
Linux kernel developers have very stringent guidelines for coding style. You can setup your editor to follow them.
vim
Add these lines to your ~/.vimrc:
filetype plugin indent on  " make sure it will automatically indent your files
syntax on                  " highlight syntax
set title                  " show the file name you are working on

set tabstop=8
set softtabstop=8
set shiftwidth=8
set noexpandtab
Prefer a plugin?
- You can have all the coding style requirements for kernel development automatically set up for you by using this plugin: https://github.com/gregkh/kernel-coding-style.git.
VS Code
Surprisingly enough, VS Code works well for kernel development these days. Make sure
to install clangd:
Arch
sudo pacman -S clangd
Fedora
sudo dnf install clang clang-tools-extra
Ubuntu/Debian
sudo apt install clangd
Then install the following extensions: C/C++, clangd
Now open any C file from the source tree (e.g. init/main.c). The clangd extension will
complain that Microsoft's "IntelliSense" is enabled, and offer to disable it for you.
Disable it.
That's it. You should be good to go!
2. Find a good first contribution
To ensure all contributions follow the guidelines for coding style, the developers created a script called checkpatch.pl.
Some drivers don't follow these rules or are simply not ready yet. These drivers are located on drivers/staging folder.
In this folder you can find some drivers to clean up.
Do not choose broken drivers to clean
Do not work on drivers that show that they depend on CONFIG_BROKEN. If you search for a driver by running make menuconfig,
and you notice the "Depends on:" line includes BROKEN, do not work on this driver.
Tips: TODO file
Some of the drivers have a TODO file. You can find drivers with this file:
find drivers/staging -name TODO
Tips: git log
You can use git log on this tree to see in which drivers developers have been working on.
Now you can find some coding style to fix on one of these drivers (for example sm750fb driver).
perl scripts/checkpatch.pl -f drivers/staging/sm750fb/*
3. Making a contribution
First, we'll choose a modification that won't require testing the module.
Are you reading this during hte LKCamp workshop?
We've prepared a file for organizing this part.
Tips to jump to line
- vim:
vim +<num_line> <file> - vscode:
code --goto <file>:<num_line>
3.1 Writing a good commit message
Most importantly you must always sign your commits, you can do that by adding -s flag when committing.
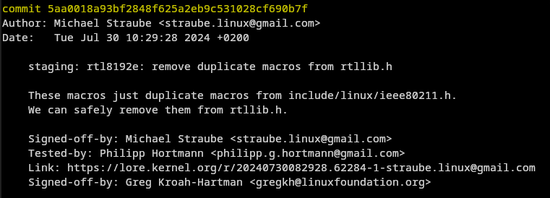
It's a good practice to indicate the tree and driver in which you are making changes, take a look at the commit below for example.
Tips: git log
You can always learn from the accepted commits. So if you don't know how to write your commit message, you can see how others have done it.
You can add and commit your changes:
git add <the_file_you_modified>
git commit -v -s
Let's be sure our commit follows the coding style.
perl scripts/checkpatch.pl -g <your_commit_id>
3.2 Sending the commit
Search for the maintainer's email, in this case use the mailing lists:
git show <your_commit_id> | perl scripts/get_maintainer.pl --nokeywords --nogit --nogit-fallback --norolestats --separator=','
Remember to add the LKCamp mailing list
Don't forget to add the emails from the maintainers.
Also add the LKCamp e-mail to the list (~lkcamp/patches@lists.sr.ht), so we can give feedbacks at each other's patches.
We have a mailing list especially to track work done by this group and people following LKCamp's tutorials, so don't forget to use it. :)
Check how the patch would be sent:
git send-email --annotate --suppress-cc=all --to="<lists>","<maintainers>","~lkcamp/patches@lists.sr.ht" --dry-run <commit_id>^
Always do a --dry-run before sending patches
From the personal experiences of pretty much everyone from LKCamp, as well as countless other newbie kernel developers:
Please save yourself the embarassment of sending patches with silly mistakes
(wrong subject, wrong recipients, etc) to the public mailing lists. Always add the --dry-run
flag before sending them off and do a final check for any mistakes.
Now, send your first patch to the public mailing lists:
git send-email --annotate --suppress-cc=all --to="<lists>","<maintainers>","~lkcamp/patches@lists.sr.ht" <commit_id>^
Congrats! You just sent your first patch to the kernel \o/
Now you just need to wait for someone on the community to review your patch.
4. Got feedback? Sending a second version of a patch
More often than not, the kernel community will give feedback on how to improve your patch.
It is very common for patches not to be accepted in their first version.
When this happens, you will need to make the modifications required to fix the problems pointed
out by your reviewers, and then send a second version (v2) of your patch.
Note
This section shows how to send a second version of a patch that has already been reviewed by the community. If you haven't sent your patch to the mail lists, follow the previous section instead.
4.0 Update your tree
First of all, remember to fetch the modifications from remote:
git fetch staging
Now you have to rebase your tree to the last accepted commit. Normally this tree will be the
-next, but if there are commits on -testing tree, you can rebase this last:
git rebase -i staging/staging-testing
4.1 Modifying your commit
Make the modifications required and add them to your staging tree:
git add <the_file_you_changed>
Add the changes to your first commit. If your commit is the last one in the tree, it's possible to just amend the last commit and include the newly staged changes:
git commit --amend
Your commit is not the last one? Just rebase it
git rebase -i <your_former_commit_id>
You can also find a tutorial here.
In the commit message, after the — cut off, add the changes made in this version:
<commit message>

Signed-off-by: Your name <your.email@domain.com>
---
Changes in v2:
    - first change
    - second change
The notes after the — cut off will not be recorded in the permanent git log.
4.2 Sending a v2
Make a V2 from your patch:
git format-patch <commit_id>^ -v2
The previous command will provide a
Test your email send:
git send-email <your_patch>.patch --suppress-cc=all --to="<lists>","<maintainers>","~lkcamp/patches@lists.sr.ht" --dry-run
Send it to the emails lists and maintainers.
- To send, just remove the
--dry-runflag from the previous command
5. (extra) Sending more contributions
Finding potential contributions to make
Return to section 2, and with perl scripts/checkpatch.pl -f <file>, find, for example,
a CHECK: Avoid CamelCase warning that needs fixing.
5.1. Testing your changes
You never know if your changes will end up breaking the kernel.
Even if you're only doing simple stuff, like fixing a variable name (checkpatch: Avoid CamelCase) or
removing a parenthesis (checkpatch: Unnecessary parentheses),
you should always test the changes you make before sending them to the community.
You must, at the very least, for every change (i.e. every commit):
- Rebuild the kernel, confirm that it compiles and make sure there are no new compilation warnings introduced by your changes
- Test if it boots on QEMU
After making your changes (and preferably before commiting), you have to test them:
In case you're working on a kernel module
We have to test the driver we are changing, so we compile it as module (M), and we control when to load it and when to remove it.
To set it up as module: access make menuconfig;
use the arrow keys to go to Device Drivers ->;
then go down to Staging drivers.
Tips: Searching feature
At any time, you can hit '?', which will show you the help text for that kernel configuration option. You can search for the driver you're modifying by '/', in order to get the driver's longer name.
Make sure the driver you're working on is compiled as a module ('M'), instead of being built-in ('*'). You can change a driver to being compiled as a module by typing 'm' when the driver is selected in the menu.
(Hitting 'y' instead will make the driver built-in, i.e., contained within the kernel image itself instead of being shipped as a loadable module. We will talk more about this later.)
Now you should build the modules with your VM as target (you will need to mount it to run this command):
sudo mount ../my_disk.raw ../mnt_partition
sudo make INSTALL_MOD_PATH=../mnt_partition modules_install
sudo umount ../mnt_partition
Now you should build and boot, as learnt on workshop 1 - section 2.
Command cheatsheet, in case you forgot
make -j$(nproc)qemu-system-x86_64 -drive file=../my_disk.raw,format=raw,index=0,media=disk -m 4G -nographic -kernel ./arch/x86_64/boot/bzImage -append "root=/dev/sda rw console=ttyS0 loglevel=6" --enable-kvm
Check for errors in the kernel log after booting:
dmesg
Load module and check the logs:
modprobe <module name>
dmesg
lsmod | grep <module name>
Remove it and check the logs again:
modprobe -r <module name>
dmesg
lsmod | grep <module name>
Any problems booting? Any error messages related to your module? Any problems loading or removing it?
If not, then you can go ahead and send the v2 for your patch. :)
Just repeat section 3.
5.2 Patch Series
A patch should do one thing and one thing only. This helps reviewers and makes it easier to find where bugs were introduced when investigating kernel regressions. If you have more than one thing that you would like to do, you will need to split the changes into multiple commits and send them as a patch series.
Patch series are two or more commits that will be submitted together in the same e-mail batch. It is common to add a cover letter to a patch series to give an explanation of what the patch series does.
You can use format-patch to generate *.patch files for all commits, plus the cover letter:
git format-patch -N <commit_id last one>^ --cover-letter -o path/to/dir
Flags of format-patch
-N: indicates the number of commits we are going to send, beware that your commit must be sequential.--cover-letter: you can send a message to the maintainers about the commit that will not be on the commit message. It's very recommended when sending a patch series, and be useful to single commits sometimes.-v<version>: indicates the version of the commit, if you have to fix something after a feedback, you should add-v2to indicate it's the second version.-o path/to/dir: save all your *.patch in the directory indicated.
Now you can edit the cover letter.
When everything is done, you may test your email send (all patches will be sent in the same command git send-email).
git send-email path/to/dir/ *.patch --suppress-cc=all --to="<lists>","<maintainers>","~lkcamp/patches@lists.sr.ht" --dry-run
Send it to the mailing lists and maintainers.
- To send, just remove the
--dry-runflag from the previous command
Sending a v2 for a Patch Series?
Even if only one patch in a patchset needs to be redone, resend the whole patchset on new versions.
Maintainers prefer to apply a whole patchset each version, so even the patches without changes between versions must be re-send.